
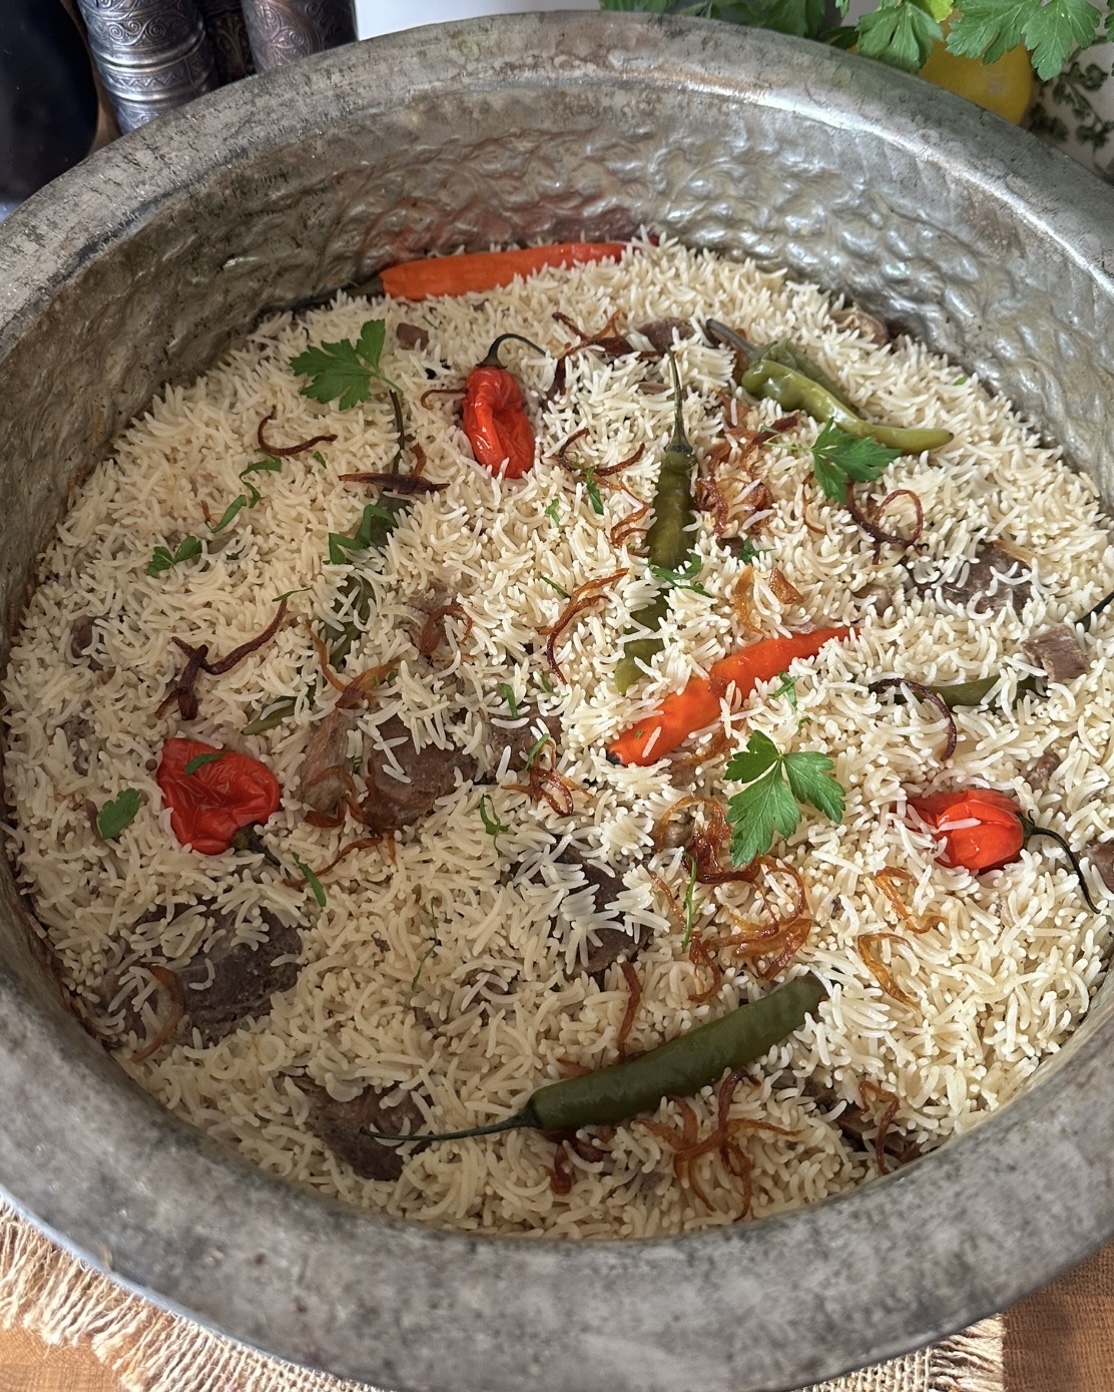


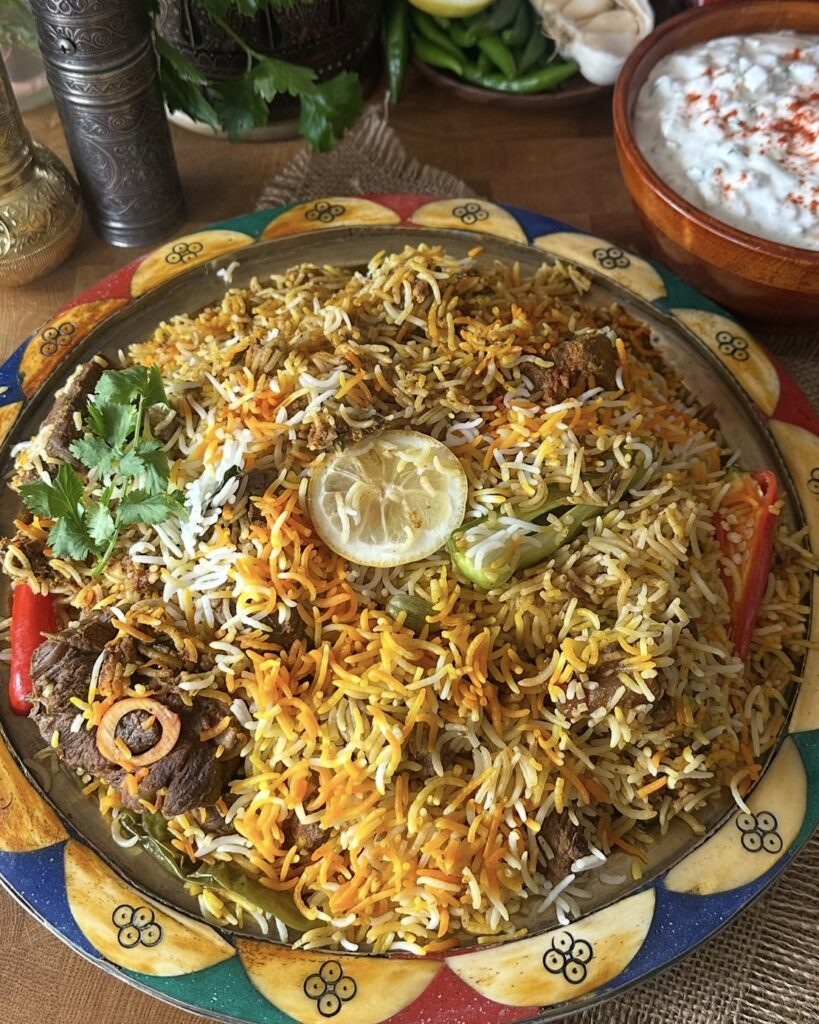
MUTTON BIRYANI
Savour the rich and fragrant layers of my homemade Mutton Biryani, a dish that reflects my passion for cooking and the timeless flavors of traditional cuisine. Each bite is a journey through tender, marinated mutton, perfectly cooked basmati rice infused with aromatic spices, and a hint of freshness from mint and coriander. The caramelized fried onions add a delightful crunch, while the vibrant colors and enticing aromas bring joy to the senses.
This biryani is more than just a meal; it’s made with care, patience, and a personalized touch that transforms every gathering into a cherished memory. Gather around the table and enjoy this culinary masterpiece with loved ones, served alongside refreshing raita and a crisp salad.
Ingredients
For the Mutton:
For the Rice:
For Garnish:
Yogurt Raita:
Instructions
Prepare the Rice:
-
-
- Place the basmati rice in a large bowl and fill it with cold water.
-
- Gently swish the rice with your hands and drain the water. Repeat this process of rinsing until the water runs clear. This removes excess starch and prevents the rice from becoming gummy during cooking.
-
- Once washed, soak the rice in clean water for 30 minutes to 1 hour. Soaking allows the grains to absorb water, which helps them cook evenly and ensures they remain fluffy.
Prepare the Paste:
-
-
- In a blender, combine the prepared tomatoes, garlic cloves, and ginger root. Blend until you achieve a smooth paste. This paste will form a flavorful base for marinating the mutton. Set it aside for later use.
Fry the Onions:
-
-
- Peel the onions and slice them thinly. You can slice them into rings or halve them lengthwise, depending on your preference. This affects the texture of the fried onions in the biryani.
-
- Heat a generous amount of oil in a frying pan over medium heat. Keep enough oil to fry the onions properly.
-
- Once the oil is hot (test by adding a small piece of onion; it should sizzle), add the sliced onions in a single layer. Avoid overcrowding the pan, as this can lead to steaming instead of frying.
-
- Cook the onions, stirring occasionally to prevent burning, until they turn golden brown and caramelized. This takes about 10-15 minutes. For crisper onions, you can cook them a few minutes longer, but watch carefully to prevent burning.
-
- Using a slotted spoon, transfer the fried onions to a plate lined with paper towels to absorb excess oil. Allow them to cool slightly, then separate using a fork to maintain crispiness.
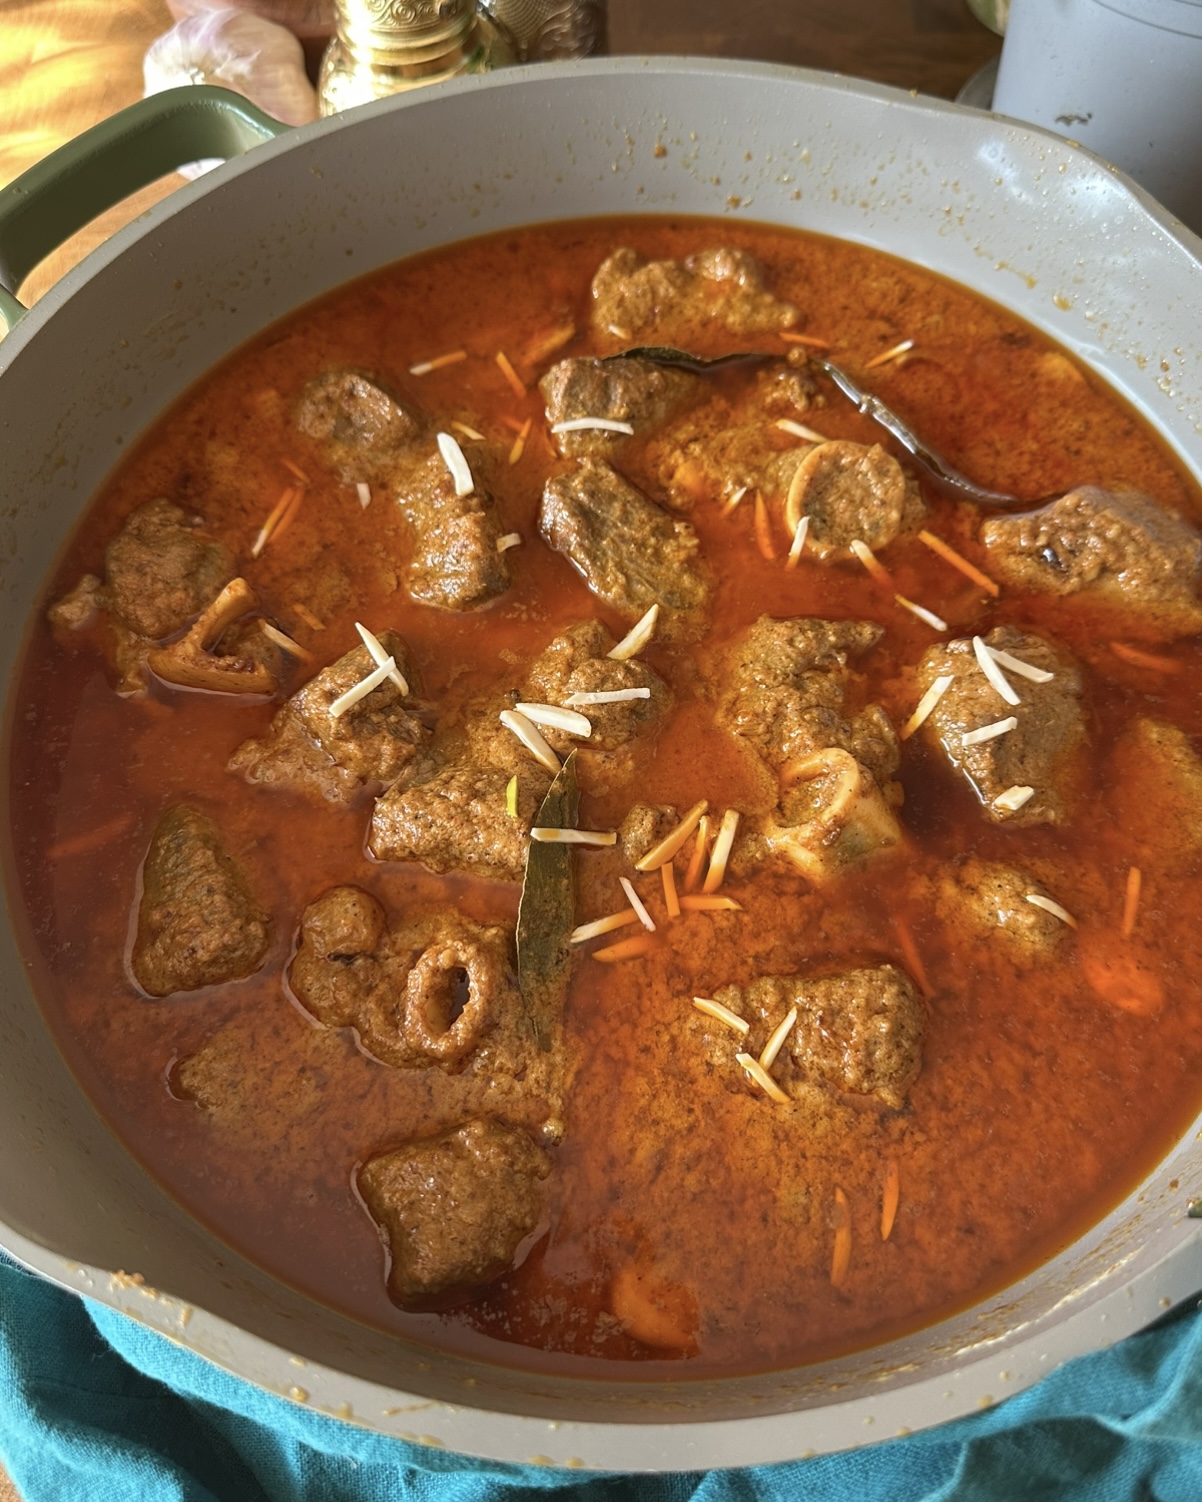
Marinate and Cook the Mutton:
-
-
- In a large mixing bowl, add the mutton pieces along with the following marinade ingredients: salt, Kashmiri chili powder, coriander powder, cumin powder, turmeric powder, homemade biryani masala, the prepared paste, fried onions (reserve some for later), chopped mint, and chopped coriander, yogurt and ghee.
-
- Mix well using your hands or a spoon to ensure that all pieces of mutton are thoroughly coated in the marinade. This step is crucial as it allows the flavors to penetrate the meat.
-
- Cover the bowl with plastic wrap or a lid. Allow the mutton to marinate in the refrigerator for at least 3-4 hours. For optimal flavor, marinate overnight.
-
- Pressure Cooker Method: In a pressure cooker, heat the reserved oil from frying onions. Add the marinated mutton and mix well. Add 1 cup of water, close the lid, and cook under pressure for about 12 minutes.
-
- Traditional Method: Alternatively, in a large pot, heat oil, add the marinated mutton, and cook over medium-high heat. Stir frequently until the oil separates from the meat mixture, which usually takes 10-15 minutes. Once the oil separates, add 3 cups of water and reduce to low heat, covering the pot. Cook until the meat is tender (about 1-1.5 hours), adding more water if necessary.
Prepare the Rice:
-
-
- In a large pot, bring water to a rolling boil. Ensure the amount of water is approximately 4-5 times the volume of the soaked rice, which helps in cooking the rice evenly.
-
- Add salt, cumin seeds, star anise, black peppercorns, cloves, green cardamoms, and the cinnamon stick to the boiling water. These whole spices will infuse the rice with rich flavors.
-
- Add the lemon slices, green chilies, mint, and coriander leaves to the pot. These will complement the rice and enhance its aroma.
-
- Once the water is boiling, gently add the soaked rice. Stir lightly with a spoon to ensure the rice is evenly distributed and not clumping together.
-
- Cook the rice until it is about 80% done; the grains should be firm with a slight bite to them. This typically takes around 5-7 minutes but depends on your stove and type of rice. Check doneness by taking a grain of rice and pressing it between your fingers.
-
- Once the rice reaches 80% doneness, carefully drain the water using a colander or sieve. Shaking the sieve lightly will speed up draining and prevent overcooking.
Layer the Biryani:
-
-
- In a large heavy-bottomed pot or deep oven-safe dish, start by placing a layer of the drained rice at the bottom. Gently level it out with a spoon.
-
- Next, add the cooked mutton, along with its gravy (if using the traditional method), spreading it evenly over the rice. Ensure that the meat is well-distributed for even flavoring in each serving.
-
- Top the mutton with another layer of boiled rice, spreading it out evenly to cover the meat. Be careful not to mix the layers, as distinct layers are key to biryani.
-
- In a small bowl, mix a few drops of yellow food color with a tablespoon of water (and kewra water if using). Drizzle this mixture over the rice, allowing the color to spread visually.
-
- Garnish with lemon slices, remaining fried onions, fresh mint, coriander leaves, and green chilies for added flavor and visual appeal.
-
- To trap the steam, cover the pot with a clean tea towel to create a tight seal. Place the lid on top to ensure no steam escapes.
-
- Cook the biryani on low heat (dum) for about 25 minutes. This slow-cooking method melds the flavors and finishes cooking the rice.
Serve:
-
-
- After 25 minutes, turn off the heat and let the biryani rest for a few minutes before carefully removing the lid.
-
- Gently fluff the rice using a plate or spoon, mixing the layers of rice and meat to distribute flavors evenly without mashing the grains.
-
- Serve the mutton biryani hot, accompanied by raita (yogurt sauce) and a fresh salad. Enjoy the layered flavors and aromatic biryani.
Yogurt Raita:
-
-
- Carefully peel the red onion, then chop it into small, even pieces.
-
- Wash the tomato and chop it finely. For a less watery raita, you can deseed the tomato before chopping, though it's not strictly necessary.
-
- Wash the English cucumber and chop it into small pieces. You can peel it if you prefer, but the skin adds a nice texture and nutrients.
-
- Rinse the coriander and chop it, including the stems for extra flavor, if you like.
-
- In a medium-sized mixing bowl, add the 2 cups of Greek yogurt. Greek yogurt gives the raita a thicker, creamier consistency, which is ideal.
-
- To the yogurt, add the 1 teaspoon of roasted and crushed cumin seeds and 1 teaspoon of salt.
-
* Incorporate Vegetables: Gently add all the chopped vegetables – the tomato, red onion, cucumber, and fresh coriander – to the bowl with the yogurt and seasonings.
-
- Using a spoon or spatula, mix all the ingredients thoroughly until everything is well combined. Taste the raita and adjust the seasoning as needed. You might want to add a little more salt, or even a pinch more cumin if you prefer a stronger flavor.
-
- For the best flavor, cover the bowl and chill the raita in the refrigerator for at least 15-30 minutes before serving. This allows the flavors to meld together beautifully.
Nutrition Facts
Servings 12
- Amount Per Serving
- Calories 974.59kcal
- % Daily Value *
- Total Fat 42.8g66%
- Saturated Fat 17.89g90%
- Cholesterol 123.19mg42%
- Sodium 1026.4mg43%
- Potassium 849.27mg25%
- Total Carbohydrate 106.5g36%
- Dietary Fiber 5.55g23%
- Sugars 3.26g
- Protein 39.97g80%
- Vitamin A 58.8 mcg
- Vitamin C 47.57 mg
- Calcium 154.38 mg
- Iron 10.36 mg
- Vitamin D 0.16 mcg
- Vitamin E 1.36 mg
- Vitamin K 13.61 mcg
- Thiamin 0.89 mg
- Riboflavin 0.48 mg
- Niacin 14.8 mg
- Vitamin B6 0.58 mg
- Folate 62.93 mcg
- Vitamin B12 4.21 mcg
- Phosphorus 444.75 mg
- Magnesium 93.79 mg
- Zinc 8.26 mg
* Percent Daily Values are based on a 2,000 calorie diet. Your daily value may be higher or lower depending on your calorie needs.

Note
Wash and Soak Rice for Biryani:
- Select high-quality basmati rice. Look for aged basmati rice, as it tends to be more fragrant and has a better texture.
- Measure the amount of rice you need based on your recipe. A common ratio is about 1.5 to 2 cups of rice for every 1 kg of meat, depending on how rice-heavy you want your Biryani to be.
- Place the measured rice in a large bowl or a fine-mesh strainer.
- Rinse the rice under cold running water. Use your fingers to gently agitate the grains, which helps remove excess starch.
- Drain the water and repeat the rinsing process 3-4 times until the water runs clear. This step is crucial, as it prevents the rice from becoming sticky during cooking.
- After rinsing, transfer the rice to a bowl and cover it with fresh water. The water should be about 2-3 inches above the rice.
- Allow the rice to soak for at least 30 minutes, but soaking for 1-2 hours is ideal. Soaking helps the grains absorb some water, which leads to even cooking and prevents breakage.
- If you’re short on time, you can soak the rice in hot water for about 20-30 minutes instead.
- After soaking, drain the rice in a fine-mesh strainer, letting it sit for a few minutes to ensure any excess water is removed. This step is important to prevent excess moisture from making the rice mushy during cooking.
- Your rice is now ready to be used for Biryani! Follow your recipe to partially cook the soaked rice before layering it with the marinated meat.
Yogurt Raita:
- To roast cumin seeds, simply place them in a dry pan over medium heat for 1-2 minutes, shaking occasionally, until fragrant. Let them cool, then crush them using a mortar and pestle or the back of a spoon.
- If you prefer a thinner raita, you can add a tablespoon or two of water or plain milk while mixing.
- Feel free to experiment with other additions like a pinch of red chili powder for a slight kick, or finely grated ginger for a pungent note.