


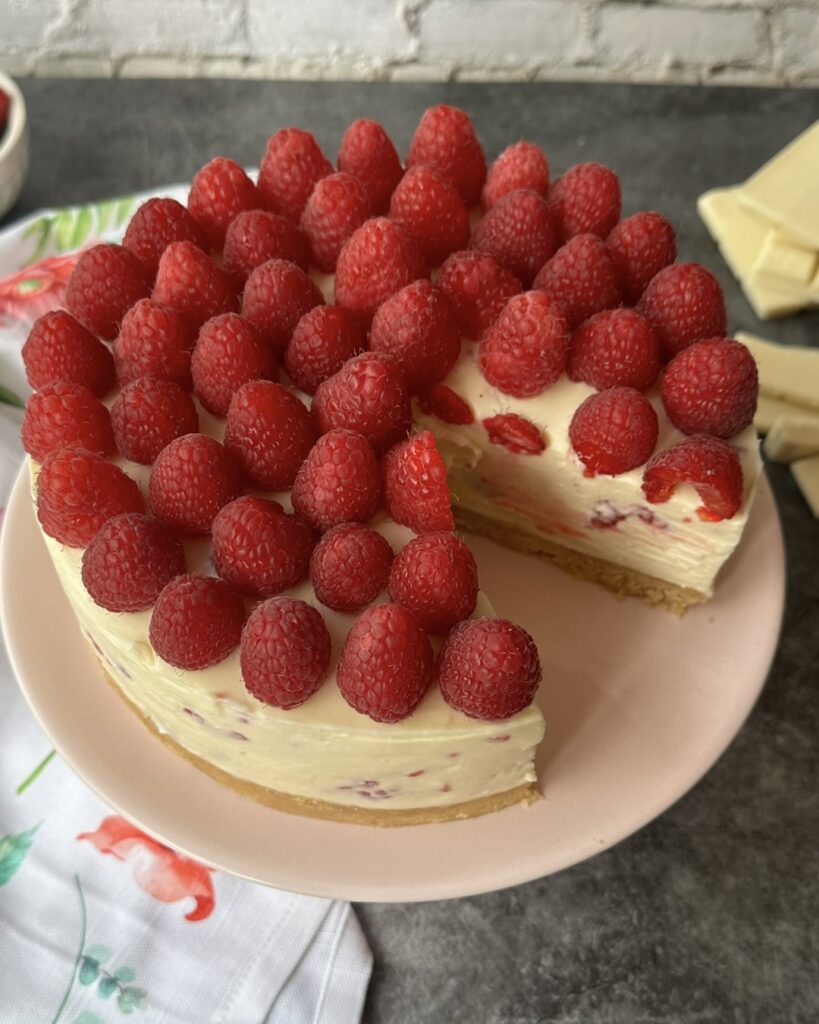
Dive into decadence with our No-Bake Raspberry and White Chocolate Cheesecake! Creamy, refreshing, and utterly delicious—your new favorite dessert awaits!
Prepare the Base
Crush the Biscuits:
- If using a food processor, place the 250 g of shortbread biscuits in the bowl and pulse them until they are finely crushed into small crumbs. This should take about 20-30 seconds.
- If you prefer the traditional method, place the shortbread biscuits in a zip-lock bag, seal it tightly, and use a rolling pin to crush the biscuits into fine crumbs. Aim for a consistency similar to sand.
Combine with Butter:
- In a bowl, pour the finely crushed biscuit crumbs and add 80 g of melted unsalted butter. Using a spatula or a spoon, mix thoroughly until all the crumbs are evenly coated with butter. The mixture should hold together when pressed.
Form the Base:
- Grease an 8-inch deep springform tin lightly with butter or cooking spray to prevent sticking. This step is optional but can help with easy removal.
- Transfer the biscuit mixture into the springform tin. Using the back of a spoon or your fingers, press the mixture down firmly to create an even layer at the bottom of the tin. Make sure it’s well compacted to avoid crumbling later. Smooth out the surface as much as possible.
Make the Cheesecake Filling
Whisk the Cream Cheese and Icing Sugar:
- In the bowl of a stand mixer fitted with the whisk attachment (or a large mixing bowl if using a hand whisk), add 500 g of full-fat cream cheese and 100 g of icing sugar.
- Start mixing on low speed to combine the ingredients, then gradually increase to medium speed. Whisk until the mixture is smooth and creamy, about 2-3 minutes.
Whip the Double Cream:
- In a same bowl, pour 350 ml of double cream. Whip the cream until it forms soft peaks. Be careful not to over-whip, as you want the cream to remain light and airy.
Melt the White Chocolate:
- Chop or break in to small pieces , 250 g of white chocolate into small pieces for even melting.
- Melt the chocolate using one of two methods:
- Double Boiler: Place a heatproof bowl over a saucepan of simmering water, making sure the bowl does not touch the water. Add the chopped chocolate and stir frequently until melted and smooth.
- Microwave: Place the chopped chocolate in a microwave-safe bowl. Heat in 15-second intervals, stirring in between, until fully melted and smooth. Allow the melted chocolate to cool slightly.
Combine Ingredients:
- Once the white chocolate has cooled a bit, pour it into the cream cheese and icing sugar mixture.
- Gently fold the chocolate into the mixture using a spatula. Make sure it’s well combined without deflating the cream cheese mixture.
- Carefully fold in the fresh raspberries, being cautious to keep some whole for texture and color.
Assemble the Cheesecake
Pour the Filling:
- Once the filling is well mixed, carefully pour it over the prepared biscuit base in the springform tin.
- Use a spatula or the back of a spoon to smooth the top of the cheesecake filling, ensuring it’s evenly distributed.
Chill the Cheesecake:
- Cover the springform tin with plastic wrap or aluminum foil. Place it in the refrigerator and chill for a minimum of 5 to 6 hours, although chilling overnight will produce the best results, allowing the cheesecake to set properly.
Decorate and Serve
Remove from the Tin:
- Once the cheesecake has set, take it out of the refrigerator. Run a knife around the edges of the cheesecake to help loosen it from the springform pan.
- Carefully release and remove the sides of the springform tin.
Add the Fresh Raspberries:
- Arrange the remaining 300 to 500 g of fresh raspberries on top of the cheesecake in decorative circles or clusters. This adds a beautiful touch and enhances the flavor.
Slice and Serve:
- Using a sharp knife, slice the cheesecake into wedges. Clean the knife between cuts for clean slices.
- Serve chilled, and enjoy the delicious combination of raspberry and white chocolate flavors!
RASPBERRY AND WHITE CHOCOLATE NO BAKE CHEESECAKE
Sweeten your day with this No-Bake Raspberry and White Chocolate Cheesecake—where rich flavors meet vibrant colors! White chocolate and fresh raspberries make the perfect combination.This dessert is particularly special because: It requires no oven time, making it a convenient dessert option that is easy for home bakers to prepare.The use of fresh raspberries not only adds a vibrant color but also provides a refreshing contrast to the sweetness of the white chocolate and cream cheese, creating a harmonious balance of flavors. The cheesecake is beautifully topped with whole raspberries, making it an eye-catching centerpiece for any gathering or special occasion.The incorporation of whipped double cream gives the cheesecake a light and airy texture, making each bite indulgently creamy yet not too heavy.This cheesecake is particularly suited for spring and summer celebrations, thanks to the refreshing fruit and its cool, creamy nature, making it the perfect treat for warm weather gatherings.
Ingredients
For the Base:
For the Cheesecake Filling:
For Decoration:
Instructions
Prepare the Base:
-
-
- Blitz the shortbread biscuits in a food processor until they become a fine crumb. Alternatively, place the biscuits in a zip-lock bag and crush them with a rolling pin until finely crushed.
-
- In a mixing bowl, combine the biscuit crumbs with the melted unsalted butter and mix well until fully combined.
-
- Transfer the biscuit mixture into an 8-inch deep springform tin. Press down firmly to create an even layer across the base. Ensure it's compact to prevent crumbs from falling apart later.
Make the Cheesecake Filling:
-
-
- In a stand mixer fitted with a whisk attachment or in a large mixing bowl, combine the full-fat cream cheese and icing sugar. Whisk until the mixture is smooth and creamy.
-
- In a same bowl, whip the double cream until thick.
-
- Melt the chopped white chocolate. You can do this by placing it in a bowl over a pan of simmering water (double boiler method) or microwave it in 15-second intervals, stirring in between until fully melted. Allow the melted chocolate to cool slightly.
-
- Once the chocolate has cooled, gently fold it into the cream cheese and icing sugar mixture. Then, add the fresh raspberries and mix gently with a spatula, ensuring not to break the raspberries too much.
Assemble the Cheesecake:
-
-
- Pour the cheesecake filling over the prepared biscuit base in the springform tin. Use a spatula to smooth the top.
-
- Cover the cheesecake with cling wrap and chill in the refrigerator for at least 5 to 6 hours, or preferably overnight for the best results.
Decorate and Serve:
-
-
- The next day, carefully run a knife around the edges of the cheesecake and gently remove it from the springform pan.
-
- Arrange the remaining fresh raspberries on top of the cheesecake in circles for decoration.
-
- Slice and serve chilled.
Nutrition Facts
Servings 6
- Amount Per Serving
- Calories 1090.7kcal
- % Daily Value *
- Total Fat 84.99g131%
- Saturated Fat 48.54g243%
- Trans Fat 2g
- Cholesterol 188mg63%
- Sodium 463.92mg20%
- Potassium 325.2mg10%
- Total Carbohydrate 74.16g25%
- Dietary Fiber 0.62g3%
- Sugars 54.74g
- Protein 11.59g24%
- Vitamin A 593.2 IU
- Vitamin C 0.56 mg
- Calcium 211.32 mg
- Iron 1.5 mg
- Vitamin D 0.94 IU
- Vitamin E 2.98 IU
- Vitamin K 12.93 mcg
- Thiamin 0.2 mg
- Riboflavin 0.55 mg
- Niacin 1.79 mg
- Vitamin B6 0.12 mg
- Folate 21.5 mcg
- Vitamin B12 0.53 mcg
- Phosphorus 227.29 mg
- Magnesium 22.71 mg
- Zinc 1.08 mg
* Percent Daily Values are based on a 2,000 calorie diet. Your daily value may be higher or lower depending on your calorie needs.
Note
- For added flavor, you can sprinkle some grated white chocolate on top of the cheesecake before serving.
- Store any leftovers in an airtight container in the refrigerator for up to 3 days.